How To Connect Printer To WiFi: Wireless Printing Guide
| Sep 19, 2024Tired of dealing with tangled cables every time you need to print something? Switching to a wireless printer can make printing more convenient and hassle-free. Whether you’re using a home or office setup, connecting your printer to Wi-Fi allows you to print from multiple devices like iPads, laptops, and smartphones without needing USB connections. But you might ask, “How do I connect my printer to Wifi?
No worries! This guide will walk you through the easy steps on how to connect printer to wifi, helping you enjoy seamless, cable-free printing in no time. Let’s start so you can finally say goodbye to the hassle of tangled cables!
With that, here are some things we will cover in this guide:
- Connect To Wireless Printer: What Are Some Advantages?
- How To Connect Printer To Wi-Fi: Two Methods To Try
- How Do I Connect My Printer To Wifi And Then To Laptop?
Connect To Wireless Printer: What Are Some Advantages?
Before we discuss how to connect wireless printer to wifi, let’s find out some of its advantages. Connecting to a wireless printer has many benefits that make printing easier and faster. Without the need for cables, you can print from different devices, whether you’re at home, in the office, or even on the go. Additionally, here are some main advantages of using a wireless printer:
1. Less Clutter
Printing wirelessly helps keep your workspace neat and organized since there are no cables running between your computer and the printer. This is especially helpful in small home offices or shared workspaces where fewer cables make the area look tidier and more organized.
2. Can Be Used By Multiple People
With a wireless printer, multiple users can connect and print from their devices. For example, in a family home, parents and kids can all send documents to the same printer from their smartphones, tablets, or laptops. In an office setting, employees can share one printer without connecting directly, making printing quick and easy for everyone.
3. Print Anywhere
You can print documents from any room in your home or office if you’re within the Wi-Fi range when printing wirelessly. For example, if you’re working on your laptop in the living room, you can easily send a document to print in your home office without needing to get up and connect your device to the printer. This flexibility makes printing tasks much more manageable and efficient.
How To Connect Printer To Wi-Fi: Two Methods To Try
Now that we know some advantages of connecting your printer wirelessly, you might be wondering, “How do I connect my printer to Wifi?” There are two methods you can use to set up a wireless connection: connect the printer directly or connect via the WPS push button. Let’s go over both options so you can choose the one that best suits your needs. And yes! These methods generally work for most major printer brands.
Method #1: Directly Connect Printer to Wi-Fi
The first method is connecting a wireless printer directly to your Wi-Fi router. These steps are for printers with a touchscreen where you can easily see and adjust the settings. Make sure your printer is within range of your Wi-Fi router. Follow the steps below to set up your wireless printer using this direct Wi-Fi method.
Step 1: Turn on your Wi-Fi router.
Step 2: On your printer’s screen, click the Settings button.
Step 3: Go to Wi-Fi or Wireless Connection Settings and click Add. This will show you all the available Wi-Fi connections in the area.
Step 4: Connect the printer to your home or office’s Wi-Fi using the network SSID and password.
Step 5: Once you choose the correct SSID and enter the appropriate password, your printer will quickly connect to the Wi-Fi.
This is the most straightforward way to connect your printer to Wi-Fi. But if you have an older printer without a screen, don’t worry. There’s another method you can use. You can quickly connect your printer to Wi-Fi using the WPS Push Button.
Method #2: Connect Printer To Wi-Fi With WPS Push Button
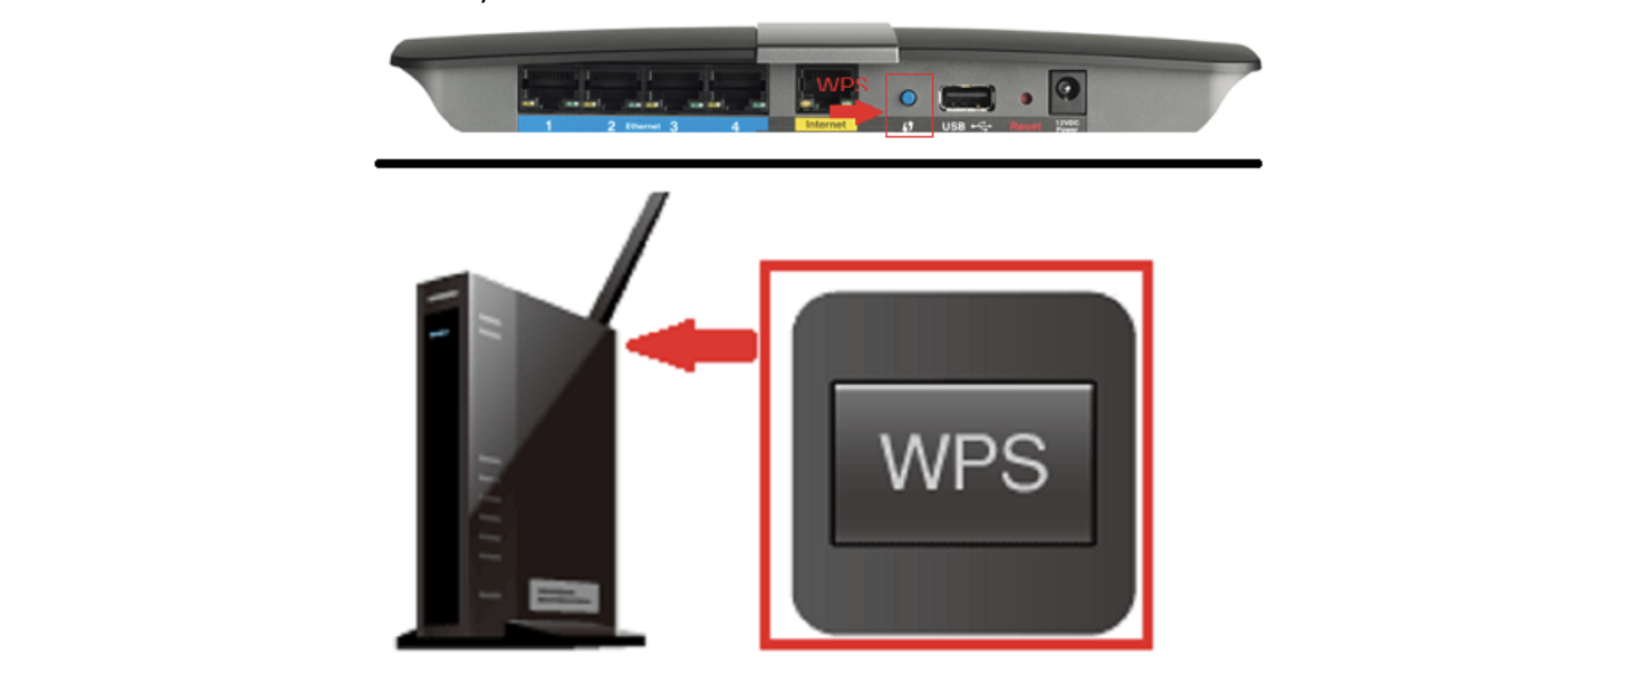
Image Source: Sony
The second method on how to connect printer to wifi is by using the WPS push button on both the printer and the Wi-Fi device. If your printer doesn’t have a touchscreen control panel but has a wireless connectivity option, follow the steps below:
Step 1: Turn on the printer and look for the WPS button on the side of the printer. There will be a little push button with the WPS icon.
Step 2: Push the WPS button on your printer, then press the WPS button on your router. Make sure to do this within two minutes. An automatic connection will be established between the two devices. The printer’s light will blink to show it’s connected to the Wi-Fi.
Step 3: If the printer won’t connect, try to push the WPS button on the Wi-Fi device first.
When the printer’s light blinks, the connection to Wi-Fi is successful.
How Do I Connect My Printer To Wifi And Then To Laptop?
Once you’ve successfully connected your printer to your Wi-Fi network, the next step is to add it to your computer so you can start using it. The guide below will show you how to add your wireless printer if you’re using either a Windows or Mac operating system.
Method #1: Add Wireless Printer to Windows Laptop
Step 1: Go to the Windows search bar, type Settings, and click on the first result. It will open a new window with a lot of options. Choose Devices.
Step 2: Click on Printers & Scanners.
Step 3: Click on the Add Printer or Scanner button. Your computer will automatically search for the wireless printers connected to your Wi-Fi network.
Step 4: After a few seconds, it will show you all the wireless printers connected to your Wi-Fi. Choose the correct printer, then click it.
Now, you’re ready to start printing from your Windows computer wirelessly. Just follow the usual steps for printing, like clicking “Print” and then choosing the right printer to start printing.
Method #2: Add Wireless Printer to MacBook
Step 1: Click on the Apple Menu button that you can find in the top left corner.
Step 2: Select System Preferences or System Settings.
Step 3: Locate and select Printers & Scanners. A new window will pop up, and you will see all the printers you can use.
Step 4: If you don’t see the printer you want to use, click Add Printer at the end of the list. A new window will open, and all the printers on the Wi-Fi network will be searched for. When you see your printer, click on it to add it to your MacBook.
After connecting the MacBook to the wireless printer, you can easily print documents and pictures by simply using a print command like pressing the Command + P button. If ever your wireless printer goes offline in the middle of printing, you can troubleshoot this by following this guide on how to fix printer offline problems.
Parting Words
How do I connect my printer to Wifi? Now you know the steps to connect easily. Whether you want to connect your wireless printer directly or via the WPS push button, you can do this by following this guide on how to connect printer to Wifi. This will make printing simpler and more organized. Enjoy cable-free printing!
Key takeaways:
- Connecting your printer to Wi-Fi lets you print from different devices, like your laptop, smartphone, or tablet, without cables. You can send print jobs from anywhere in your home or office on the same Wi-Fi network. This makes printing easier and keeps your space tidy without needing to plug in cables.
- What are two methods to connect to a printer wirelessly? You can connect your printer to Wi-Fi either directly through its settings or using the WPS push button. Check the guide on how to do this step-by-step.
- After connecting to Wi-Fi, you can add the printer to your Windows laptop or MacBook to start printing wirelessly.
If you have any questions, don’t hesitate to contact our customer service team. Call us toll-free at 1-833-465-6888, Monday to Friday, between 6 am and 4 pm PT. CompAndSave is here to make sure your printing experience is a great one!
Frequently Asked Questions
1. Why can’t my laptop find the wireless printer?
If your laptop can’t find the wireless printer, it might be because it is not connected to the same Wi-Fi network. Make sure the printer is turned on and properly connected to the network. You can also try restarting the printer and the laptop to refresh their connections. Also, make sure your laptop’s Wi-Fi is on and working correctly.
2. Can I print from my smartphone or tablet using the wireless printer?
Yes, you can print from your smartphone or tablet using a wireless printer. Most modern printers support mobile printing through Wi-Fi, Bluetooth, or apps like Apple AirPrint or Google Cloud Print. Connect your device to the same network as the printer and select the printer when printing. You can also check out this guide to print from Android Phone easily.
3. How can I troubleshoot a slow wireless printer?
To troubleshoot a slow wireless printer, check the Wi-Fi signal strength. Move the printer closer to the router if the signal is weak. Restart the printer and the router to refresh the connection. Also, clear the printer queue on your computer to remove stuck print jobs. You can also reduce the print quality in the printer settings, as high-resolution printing can slow down the process.
Related Articles:
How To Fix Printer Offline Problem?
How to Print From iPhone and iPad?


