How to Use Printhead Cleaning Kit for Epson EcoTank Printer?
| Apr 07, 2025
Is your Epson EcoTank printer skipping lines, printing faded pages, or not printing at all? You’re probably dealing with a clogged printhead—a common issue caused by dried ink blocking the nozzles, especially when the printer isn’t used regularly. The good news? You don’t need to replace your printer or visit a repair shop—using a printhead cleaning solution can save the day!
In this guide, we’ll show you exactly how to use printhead cleaning kit for your Epson EcoTank printer, helping you restore clear, vibrant prints at home. If you are using cartridges, you can also check this guide on How to Clean Printhead: Automatic and Manual. Get back to printing in no time!
With that, here are some things we will discuss in this guide:
- Epson EcoTank Printhead: What You’ll Need to Clean Them
- How to Use Printhead Cleaning Kit for Epson EcoTank Printer: Step-by-Step Guide
- Clogged Epson Print Head: Tips to Prevent Them
Epson EcoTank Printhead: What You’ll Need to Clean Them
Before you begin the cleaning process, it’s important to have the right tools on hand. Using a proper cleaning kit for Epson printer ensures a smooth and safe experience without damaging your printer. Let’s take a look at what you’ll need to get started.

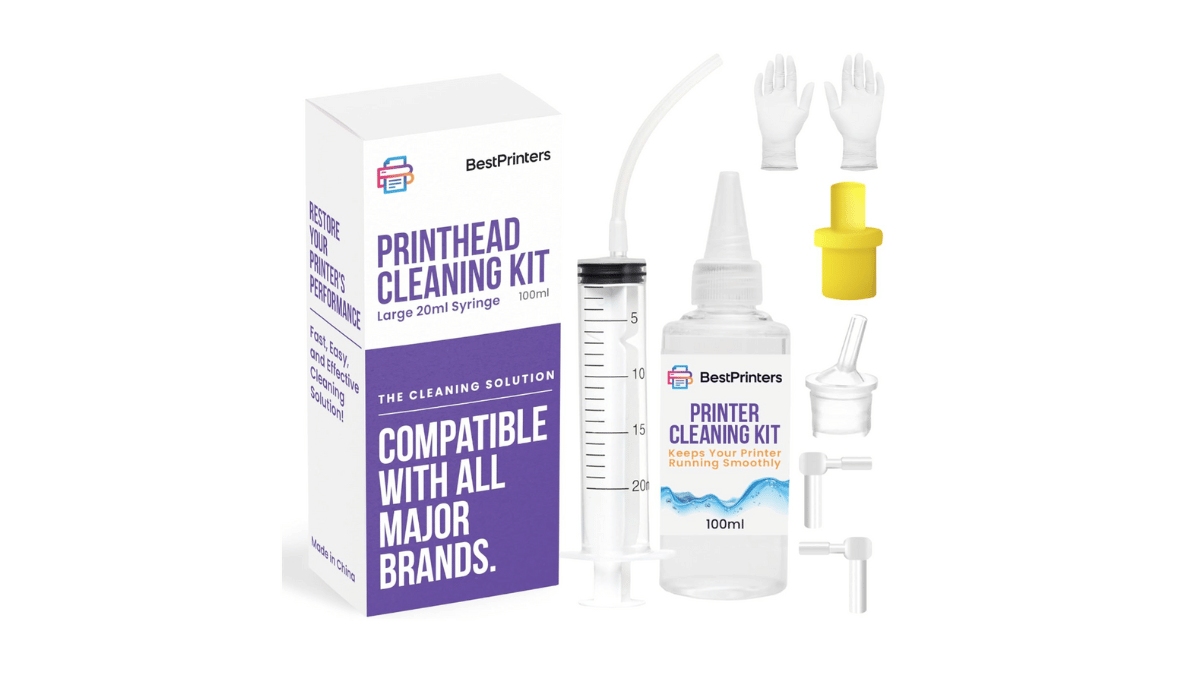
Image Source: Amazon
1. Printhead Cleaning Kit: This kit should include:
- Cleaning fluid
- 20 milliliter syringe
- Gloves
2. Paper Towels: These are placed under the printhead to catch excess fluid and ink.
3. Epson EcoTank Ink: To refill the ink tanks after cleaning.
How to Use Printhead Cleaning Kit for Epson EcoTank Printer: Step-by-Step Guide
Cleaning your Epson EcoTank’s printhead might seem tricky, but it’s simple with the right tools. A printhead cleaning kit helps flush out dried ink and restore smooth ink flow. Follow these steps to learn how to use printhead cleaning kit for your Epson EcoTank printer. The example below uses the Epson EcoTank ET-2800, but the process is similar for most EcoTank models.
Step 1: Unlock the Printhead
- Power on the printer and start a print job, like printing a test page.
- As the printhead moves back and forth, unplug the printer to stop it in the middle for easy access.
- Open the printer lid and position the printhead in the center.
Step 2: Prepare Cleaning Materials
- Place a plastic sheet or foil under the printhead to protect the area.
- Fold a paper towel or kitchen paper several times and moisten it with cleaning fluid.
- Slide this under the printhead to catch excess fluid during cleaning.
Step 3: Flush the Printhead
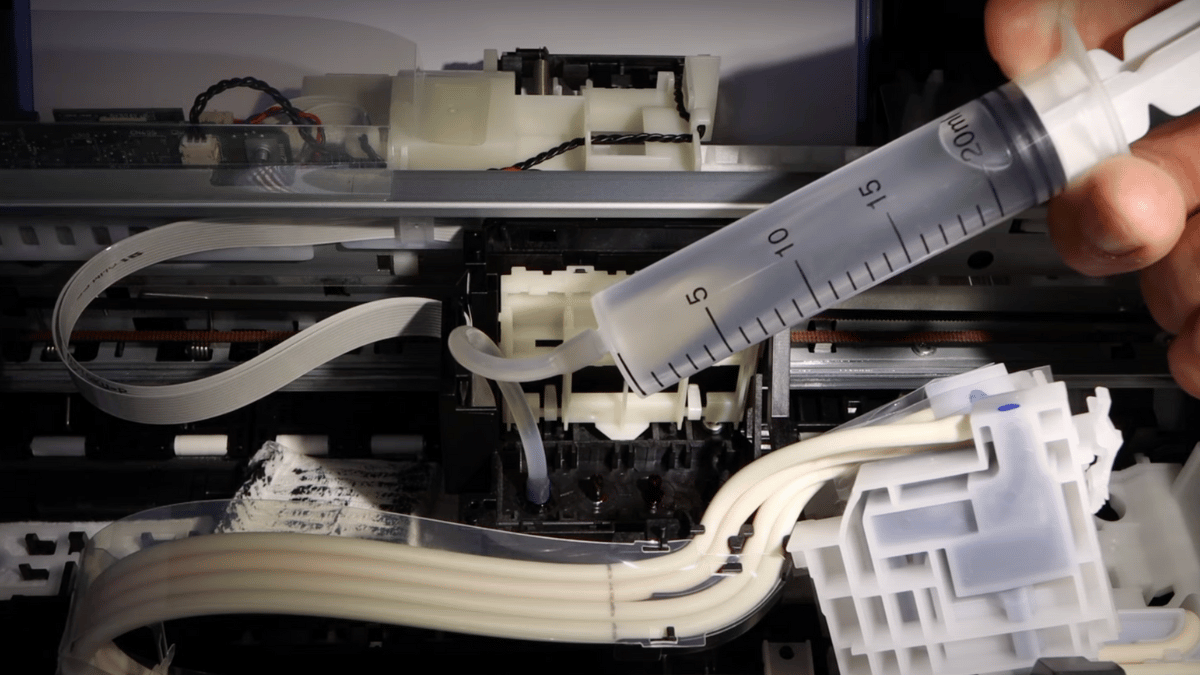
- Fill a syringe with the Epson print head cleaner fluid from your kit.
- Attach a rubber tube to the syringe and connect it to the ink inlet ports on the printhead.
- Slowly push cleaning fluid through each nozzle (Black, Yellow, Magenta, Cyan), focusing on clogged colors. Push 10–20 ml of fluid per nozzle. Here’s a sample:

Image Source: The Printer Guy YouTube Video
Step 4: Remove Excess Ink
- Replace paper towels under the printhead as they become saturated with fluid and ink.
- Let any remaining fluid drain completely before proceeding.
Step 5: Reassemble
- Reconnect ink lines securely.
- Replace any removed panels or covers.
Step 6: Wait for Drying (24–48 hours)
- Allow all components to dry thoroughly before proceeding.
- This step is crucial to prevent any moisture from affecting the print quality or causing further issues.
Step 7: Fill Up Ink Tanks
- After the waiting period, fill up the ink tanks with the correct Epson EcoTank ink. Ensure each tank is filled to the recommended level.
Step 8: Power Cleaning (Optional)
- If necessary, perform a power cleaning cycle via the printer’s maintenance settings. This step helps push new ink through the printhead and can improve print quality.
Step 9: Print Nozzle Check Report
- Finally, print a nozzle check report to verify that the printhead is functioning correctly.
- Check for any gaps or streaks in the printed lines. If everything looks good, you’re ready to print normally.
Clogged Epson Print Head: Tips to Prevent Them
Preventing a clogged printhead is easier than fixing one using a printhead cleaning solution. With a few simple habits, you can keep your Epson EcoTank printer running smoothly and avoid unnecessary downtime. Here are some practical tips to help you maintain clear, consistent prints:
- Print something at least once a week: If your printer sits unused for too long, the ink can dry up inside the nozzles. Printing a page now and then keeps the ink flowing and prevents a clogged print nozzle.
- Use good-quality ink: Low-quality ink can leave behind a sticky residue that blocks the printhead. If you prefer more affordable options, CompAndSave Epson ink bottles offer ultra-high yield and great quality, making them a perfect choice to keep your printer running smoothly without breaking the bank.
- Always turn off the printer using the power button: Don’t just unplug your printer. Using the power button makes sure the printer seals the nozzles properly and keeps the ink from drying out.
- Keep your printer clean and away from dust: Dust can sneak inside and mix with ink, causing clogs. Wipe around the printer regularly and place it in a clean, dry space.
- Refill your ink tanks before they run empty: Running the printer on very low ink can suck air into the printhead. This can cause blockages or uneven ink flow, so top up the tanks in time.
Final Thoughts: Is Using Printhead Cleaning Solution Worth It?
If you’re dealing with issues like faded prints or clogged printhead nozzles, using a printhead cleaning solution is a great option to restore your Epson EcoTank printer’s performance. This simple, cost-effective method can quickly clear blockages and prevent further damage. Rather than spending money on professional repairs, you can save time and hassle by learning how to use printhead cleaning kit at home.
By following the proper steps and using a high-quality cleaning solution, you can extend the lifespan of your printer and maintain high-quality prints for longer. Whether you’re a regular user or someone who prints occasionally, investing in a cleaning solution and kit is a smart move. Ready to get your printer back to its best? Grab a printhead cleaning kit and keep your Epson EcoTank printer running smoothly today!
Key Takeaways:
- Printhead cleaning can resolve common printing issues. Whether it’s streaks, faded prints, or no print at all, using a cleaning solution can help clear blockages and restore your printer’s performance.
- Using an Epson print head cleaning kit is a straightforward DIY fix. You don’t need to be a tech expert to use a printhead cleaning kit. With simple instructions, you can fix common problems yourself, saving both time and money.
- Prevent clogs by printing regularly. Regularly printing even small jobs helps prevent ink from drying in the printhead, reducing the risk of clogs. Consistent use keeps your printer in good shape and ready when needed.
Frequently Asked Questions
1. How often should I use a printhead cleaning kit on my Epson EcoTank?
You should use a printhead cleaning kit only when you notice print quality issues like streaks or missing colors or when the Epson EcoTank not printing anything. Over-cleaning can waste ink and cause wear on the printer. Regular printing and proper shutdown can reduce the need for frequent cleanings.
2. Can I use any printhead cleaning solution for my Epson printer?
No, it’s important to use a printhead cleaning solution that’s compatible with your printer’s ink type (dye or pigment). Using the wrong solution could damage the printhead or worsen clogs. Look for options labeled for Epson EcoTank or your specific printer model.
3. What causes clogged printheads in Epson EcoTank printers?
Clogged printheads usually happen when the printer sits idle for long periods or when low-quality ink is used. Environmental factors like dust and heat can also contribute to clogs. Regular use and proper storage can help prevent clogged Epson print heads.
4. Is it safe to use a syringe to flush the printhead?
Yes, using a syringe and silicone tube is a standard method included in most printer-nozzle cleaning kits. Just be sure to apply gentle pressure and follow the instructions carefully. Avoid forcing the liquid, as too much pressure can damage the internal components.
5. What should I do if cleaning doesn’t fix the problem?
If your Epson is not printing anything even after cleaning, repeat the process or let the solution soak longer. You may also want to run the printer’s built-in deep cleaning cycle. If the issue persists, the clog may be severe, and professional servicing might be required.
Related Articles:
How to Clean Printhead: Automatic and Manual
Does Printer Ink Dry Out? Here’s How to Fix a Dried Ink Cartridge
