How To Print From Android Phone: Explore 4 Easy Methods!
| Aug 31, 2024How do I print from my Android phone?
Android phones have been helpful in our daily tasks, and printing from them can make things even easier and faster. Whether you need to print a photo or a document, there are several methods you can use. But how can we do this?
In this guide, we will walk you through the steps on how to print from Android phone to help you get started. With just a few taps on your screen, you can send your files to a printer and have them ready in no time!
With that, here are some things we will cover in this guide:
- Print From Android To Printer: 3 Advantages
- How Do I Print From My Android Phone: 4 Methods To Try
- How To Print From Android Phone – Photos, Texts, Email
Print From Android To Printer: 3 Advantages
An Android phone is a smartphone that uses the Android operating system developed by Google. While you can use it primarily for communication, it also offers the convenience of printing. Printing from an Android device is easy and helps you work more efficiently, making it a versatile tool for personal and professional tasks. Additionally, here are some advantages of using Android phones when printing:
1. Convenience
You can print from anywhere, at any time, without needing a computer. Whether at home, in the office, or traveling, you can simply open the document or photo on your phone and send it to a nearby printer. With Wi-Fi or Bluetooth connectivity, you can connect your phone to a printer and start printing immediately, saving time and effort.
2. Easy Setup
Many printers have easy setup options like Wi-Fi or Bluetooth, making it simple to connect your Android phone. Printer apps also guide you through the setup so you can start printing quickly. This makes it easy to begin printing from your Android device without much trouble.
3. Flexibility For Multiple Users
Multiple users can use the same printer when printing from their Android devices. Each user can send their print jobs to the printer, allowing everyone to print their documents efficiently without needing separate printers. This makes it convenient for shared workspaces or homes where several people need to print different things.
How Do I Print From My Android Phone: 4 Methods To Try
Now that we’ve covered some advantages of printing from Android devices, let’s explore how to print from Android phone easily. You can try four methods: print via Bluetooth, Wi-Fi, USB cable, or use Papercut Mobility. Let’s discuss each of these methods below.
Method #1 - Print Using Bluetooth Connectivity
Although only a handful of printers support Bluetooth connectivity nowadays, it’s a more straightforward way to print from phone than Wi-Fi networks. The process is quite simple. If you have ever connected your wireless earbuds or speakers to your phone via Bluetooth, then you’ll know how to print from an Android phone via Bluetooth.
Following the steps below, connect your Android device to a Bluetooth printer and start printing.
Step 1: Turn On Bluetooth on the Printer
Enable Bluetooth on your printer. Check the instruction manual for specific steps, as different brands may have different methods.
Step 2: Enable Bluetooth on Your Android Device
Go to your Android phone’s settings. Navigate to “Connected devices” or “Bluetooth” and turn on Bluetooth.
Step 3: Pair the Devices
On your Android device, go to “Connected devices” and select “Pair new device,” or wait for the device to scan for nearby Bluetooth devices. When your phone detects the printer, select the printer’s name from the list of available devices.
Step 4: Complete the Pairing Process
Enter the printer’s PIN code to complete the pairing process if prompted. This code is usually found in the printer’s manual or on the printer itself
Step 5: Verify the Connection
Once paired, ensure that the printer is connected to your Android device. You may see the printer listed under paired devices
Step 6: Print Your Document
Open the document or file you want to print on your Android device. Select the print option, choose the paired Bluetooth printer, and confirm any print settings before sending the print job.
Note: Keep the mobile close to the printer, as Bluetooth doesn’t have a high range. Also, if you close the Bluetooth, either from the printer or the mobile, it will disconnect. So make sure not to do this mid-printing.
NFC Connection: Some printers also feature an NFC connection (Near Field Communication), which makes it even easier and faster to connect Android to Bluetooth. Look for an NFC mark on the front or side of your printer if it supports an NFC connection. If you find it, turn on NFC on your phone and tap it on the printer where the NFC mark is. This should automatically connect the Android phone to the printer via Bluetooth.
Method #2 - Print Using Wi-Fi
How to print from Android phone to wireless printer? This one is done in a number of ways, but we’ll focus on two: Android Default Print Service and Printer’s Mobile App
Add Printer to Android Via Wi-Fi - Default Print Service
Almost all major printer brands, like Brother, HP, Dell, Canon, and Epson, offer wireless printing for Android phones. You can use Android’s default print function or the printer’s app.
Here’s how to print from phone using Wi-Fi:
Step 1: Ensure Same Wi-Fi Network
Connect both your Android device and the printer to the same Wi-Fi network. If you have multiple Wi-Fi connections, your device may automatically connect to the one with the best signal strength, while your printer may be connected to a different one. Ensure they are connected to the same network.
Step 2: Access Settings
Go to your Android phone’s settings menu. Use the search bar in the settings menu to find “Printing” and select it from the suggestions.
Step 3: Enable Default Print Service
Select “Default Print Service” (or “System Printing Service” on some devices) and turn it on. This will activate the service to scan for compatible printers on the network.
Step 4: Select Your Printer
A list of compatible printers connected to the same Wi-Fi network should appear. Select your printer model from this list. If your printer does not appear in the list, you can manually add it by tapping the three-dot menu icon or plus button and selecting “Add Printer.” You can then choose to add the printer via Wi-Fi Direct or by entering its IP address.
Step 5: Confirm Connection
Once you’ve selected your printer, ensure it is correctly connected and ready for use. You can now print documents, photos, and web pages directly from your Android device.
What If It Doesn’t Detect the Printer? Add Printer to Android Using Printer’s Mobile App:
If your Android device does not detect your printer, you can use the printer’s mobile app to connect and print. Here are the steps to follow:
Step 1: Access Printing Settings
Go to your Android device’s settings menu. Search for “Printing” and select it from the results.
Step 2: Navigate to Default Print Service
Select “Default Print Service” or “System Printing Service” and toggle the switch to “On” if it’s not already enabled.
Step 3: Check for Available Printers
If your printer is not listed, tap the three-dot menu icon or plus button in the top right and select “Add service” or “Add printer”.
Step 4: Download Printer App
This will take you to the Google Play Store. Here, you can find and download the app for your printer’s brand (e.g., Brother, HP, Dell, Canon, Epson).
Step 5: Install and Open the App
Download and install the app from the Google Play Store. Open the app and follow the prompts to allow necessary permissions.
Step 6: Scan for Printer
Open the printer settings again and select the newly installed app. Turn on the app and let it scan for your printer. It should now detect your printer.
Alternative: Use Third-Party Apps
If the manufacturer’s app does not work, you can try third-party printer applications like PrintShare Mobile Print from the Google Play Store.
Method #3 - Print From Android Phone via USB
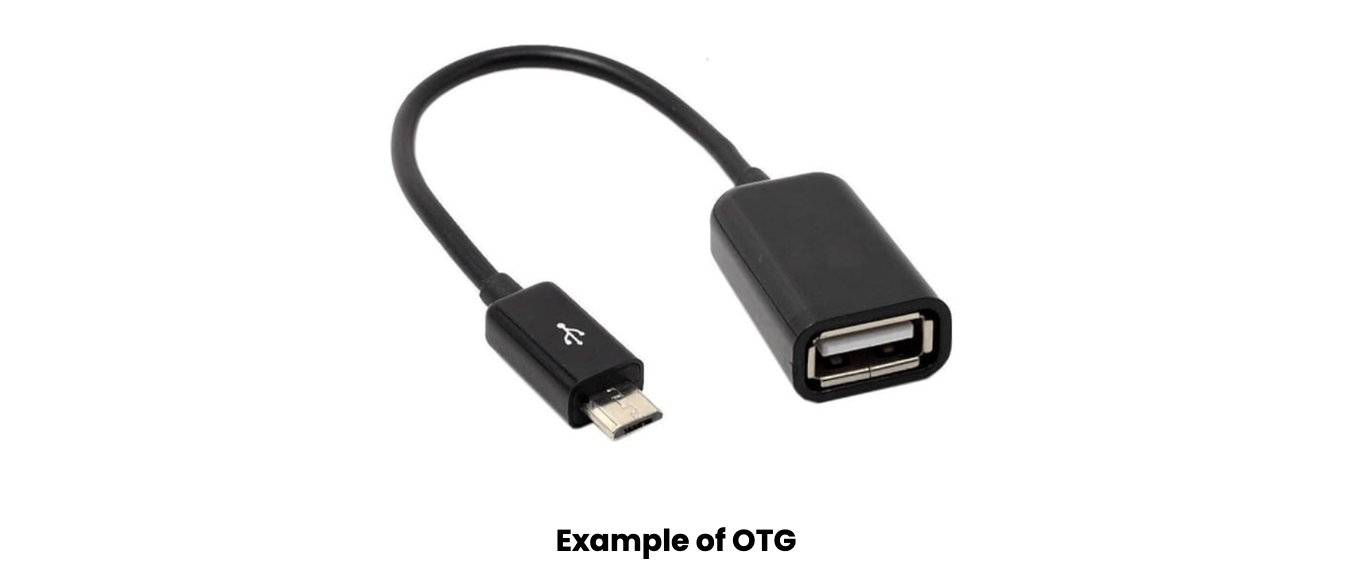
This is also one of the most popular ways to print from Android phones, but it is not as easy as printing via Bluetooth. This is because you must install an app and buy an OTG device to connect the printer to an Android phone.
(Image Source: Amazon)
Following these steps, you can successfully learn how to connect printer to Android phone via USB using an OTG device and print your documents:
Step 1: Determine USB Port Type
Check which type of USB port your phone has (e.g., USB-C, USB mini A, USB mini B, USB Micro A/B).
Step 2: Purchase OTG Device
Buy an OTG (On-The-Go) adapter that matches your phone’s USB port type. This adapter will have a USB A port for the printer cable and a connector for your phone.
Step 3: Connect USB Cable to Printer and OTG Device
Connect the USB B end of the printer cable to the printer. Next, connect the USB A end of the printer cable to the OTG device. Then, connect the OTG device to your phone.
Step 4: Download and Install NokoPrint App
Go to the Google Play Store and download the NokoPrint app. Alternatively, you can use the PrintShare Mobile Print app if NokoPrint does not work.
Step 5: Enable OTG Settings
Go to your phone’s settings, navigate to additional settings, and scroll down to find the OTG settings. Turn on the OTG settings if available. If not, proceed to the next step.
Step 6: Install Printer Drivers
Once you connect the OTG device to your phone, you will get a pop-up from NokoPrint asking you to install printer drivers. Press OK and follow the prompts to select your printer and install its driver.
Step 7: Start Printing
After installing the drivers, you can start printing directly from your Android phone using the NokoPrint app.
Method #4 - Print from Android Using Google Cloud Alternative (Papercut Mobility)
(Image Source: Google Play)
After Google Cloud Print shut down in January 2021, people needed a new way to print from their devices. One good alternative is PaperCut, but you must connect your printer to start printing from your Android device. Here’s how you can do it:
Step 1: Ensure Same Wi-Fi Network
Ensure your Android device and the printer are connected to the same Wi-Fi network.
Step 2: Download and Install PaperCut Mobility Print
Go to the Google Play Store and download the PaperCut Mobility Print app. Then, create an account.
Step 3: Open the App and Navigate to Settings
Open the Mobility Print app and navigate to your Android device’s settings. In the settings, select “Mobility Print” and turn it on by tapping the toggle button in the top right corner. Then exit the settings
Step 4: Open the File to Print
Open the document, photo, or webpage you want to print from your Android device.
Step 5: Select the Printer
Tap the menu button (usually three vertical dots) and select the “Print” option. Choose your printer from the list of available printers. If you don’t see your printer, ensure the Mobility Print service is enabled.
Step 6: Authenticate and Print
Enter your username and password to authenticate with the PaperCut system if prompted. Once authenticated, tap the print icon to send the print job to the printer
How To Print From Android Phone – Photos, Texts, Email
How do I print from my Android phone? Well, now that you have connected the printer to your Android phone, you can print out the content you have on your phone. Here are the steps to print either photos, texts, or emails using your Android phone.
How To Print Photos From An Android Phone?
If you want to print photos from Android, the process is simple. Follow these steps:
Step 1: Open the Photos App or File Manager
Open your photos app (such as Google Photos or Gallery) or go to the File Manager. Then, choose the photos you want to print by tapping on them.
Step 2: Access the Print Option
Find the “Print” option in the menu. This is usually represented by three vertical dots (⋮) in the top-right corner of the screen. Tap on these dots to open the menu and select “Print.”
Step 3: Select Your Printer
Tap on the “Select Printer” button. If you use an app like PaperCut, you will see its icon next to the printer. Choose your connected printer from the list.
Step 4: Adjust Print Settings
Adjust the print settings, such as paper size, color, and orientation. You may need to expand the menu to see these options.
Step 5: Confirm and Print
Once you’ve adjusted the settings, tap the print icon to send the print job to the printer.
Alternative: Using Third-Party Apps
(Image Source: NokoPrint)
If you prefer, you can use a third-party app like NokoPrint to select and print your photos directly. These apps often simplify the process by integrating the print function within the app.
How To Print Text Messages From Android?
To print text messages from an Android phone, you can use two main methods: taking screenshots or using a third-party backup app. Here are the steps for both methods:
- Screenshots: It’s easy but comes with a hassle depending on how many texts you want to print.
- Super Backup app: It is convenient and quick but requires downloading a 3rd party app.
So let’s discuss both:
Method 1: Using Screenshots to Print Texts from Android
Step 1: Open your SMS or messaging app on your Android device.
Step 2: Go to the messages you want to print.
Step 3: Press and hold the Power and Volume Down buttons simultaneously to take a screenshot of the messages. You can also use the “scrolling screenshots” feature if available on your device to capture more content.
Step 4: Go to your Photos app and navigate to the Screenshots folder. Select the screenshots of the text messages you want to print.
Step 5: Tap the share icon and select “Print” from the options.
Step 6: Choose your printer from the list of available printers. Adjust any print settings if necessary and tap the print button to send the job to the printer.
Method 2: Using the Super Backup App
(Image Source: Google Play)
Step 1: Download and install the “Super Backup and Restore” app from the Google Play Store.
Step 2: When prompted, select a folder in your phone’s directory where the app will store backups.
Step 3: Tap on “SMS” and then “Backup Conversations.” The app may ask for permission to access your contacts and messages. Grant the necessary permissions to proceed.
Step 4: Check all the messages you want to print and tap “Back Up” at the bottom of the screen.
Step 5: You will be asked to select a file name for the backup. You can rename it or leave it as is and click OK.
Step 6: Go back to the app and click on “View Backups.” Tap on the file you just created. The backed-up messages will open, and you will see a print button in the top right corner. Tap on it to print the text messages like any other document.
How To Print An Email From An Android Phone?
Following these steps, you can easily print an email from your Android phone.
Step 1: Open the Email
Go to your email app (e.g., Gmail, Outlook) and open the email you want to print.
Step 2: Access the Print Option
Tap the three vertical dots (⋮) at the email’s top right corner to open the drop-down menu. From the menu, tap on the “Print” option.
Step 3: Adjust Print Settings
Adjust the print settings such as paper size, orientation, color, and number of copies according to your preferences if needed.
Step 4: Select the Printer
Tap the “Select Printer” button and choose your printer from the list of available printers.
Step 5: Confirm and Print
Once you’ve selected your printer, review your print settings and tap the print button to send the print job to the printer.
Parting Words
“How do I print from my Android phone?” As you can see, there are plenty of ways to print from an Android phone through the internet. But if your printer’s Wi-Fi isn’t working, you can use a USB cable or Bluetooth to connect your phone directly to the printer. This means you can print whenever necessary, even if your computer is unavailable.
With all these connectivity options, printing from an Android phone is easy and convenient. So, remember to follow our guide on how to print from Android phone, find the method that works best for you, and start printing effortlessly!
If you have more questions about printing or want to order cheap ink cartridges for your printer, please contact us at our toll-free number: 1-833-465-6888. Our customer service team can help you from Monday to Friday, 6 am-4 pm PT.
Frequently Asked Questions
1. What are the most common issues when printing from Android phones?
Common issues when printing from Android phones include the printer not being detected, outdated printer apps or firmware, network connectivity problems, and compatibility issues with Android updates. To resolve these, ensure your printer and phone are on the same Wi-Fi network and restart both devices if necessary. Update your printer app and firmware to the latest versions. You can also check for Android updates affecting printing and adjust app permissions accordingly.
2. Can I print from my Android phone without an internet connection?
Yes, you can print from your Android phone without an internet connection. You can use a USB cable to connect your phone directly to the printer or use Bluetooth if your printer supports it. This way, you can print documents and photos even when you don’t have Wi-Fi.
3. How do I update my printer app on my Android phone?
To update your printer app on your Android phone, go to the Google Play Store and search for the printer app. Check if there are any updates available and install the latest version. This will help ensure compatibility and resolve any issues you might be experiencing with printing.
Related Articles:
How To Fix Printer Offline Problem?


