How to Make a DIY Wedding Photo Canvas
| Jul 15, 2015It can be a great idea to create wall art from your own photos, particularly wedding photos. This is one of a kind, personalized wall art that is special to you. It’s a home décor that you can make at home without any special equipment or knowhow. You can get great results, including vintage or distressed looking images if that is what you’re looking for. Here are some tips to get you started on creating truly memorable wedding photo canvases!
Picking the Best Photos
You likely had (or plan to have) a professional photographer to take pictures at your wedding. In that
 |
|---|
| Image from Sergio Vassio Photography |
case you probably have a great bunch of pictures to choose from. However, don’t pick only the most obvious posed pictures. Some fun ideas are: a rear view of the wedding couple, a close-up of the rings, the bridal bouquet or even the wedding shoes (one or both pairs), dad’s hand holding the bride’s as he gives her away, or a close up of the groom with his grandpa…. Pick photos that are unusual, meaningful, or which are interesting because of their angle, lighting, and so on.
You could also pick a series of photos which tell a story. You could also use stylized initial letters or dates (date of the wedding, the day that you met and so on). And don’t hesitate to add photos not related to the wedding – the bride or groom as a baby and then at the altar.
Another idea: how about creating a photo canvas out of your wedding vows? Especially, if you wrote them yourself! You could play around with textures, borders, filters, and tints (i.e. monochrome, sepia) as well. You could even break one image up into several parts, and print them out in parts, and then place them in the correct sequence on the wall to create a jigsaw like effect.
How to Make a DIY Wedding Photo Canvas
You will need:
- Blank canvases (check out these specially-priced canvas, cloth and fabric canvases here)
- The photos you’ve picked out (consider larger sizes or magnify one portion of a photo) in the shape of the canvas you plan to use
- Mod Podge (matte finish)
- Craft scissors or knife
- Brushes (paint brush, foam brush and so on)
- Black acrylic paint
- Sand paper
 |
|---|
| Image from Designertrapped.com |
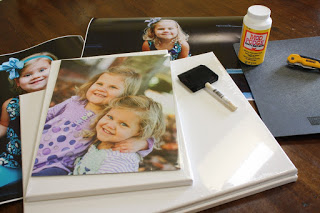
Print out your pictures on good quality photo paper using the best quality settings on your printer. Now smooth the surface of the canvas using some sandpaper to make the Mod Podge adhere well). Coat the surface of the canvas with Mod Podge and position the photo over it carefully – make sure it is properly aligned and not askew. Let dry and set. Trim the sides of any excess using a knife or scissors. Now coat the picture with a very thin layer of matte finish Mod Podge (it may look opaque at the moment but will dry out clear, never fear). While that layer is still wet, use a spare canvas and press that down over the photo and pull away to get that canvas texture. Now let this dry again. Paint the sides of the canvas with black acrylic paint to finish.
Position your canvases on walls, doors, or other strategic locations such as the side of your staircase etc. Consider creating a collage of canvases on your wall. This can be a series that tells a story or a collection of pictures in a shape of your choice. For example, a large heart shape, one central photo with several smaller ones on the side and so on.
Tie the Knot with Our Affiliate Program
And here’s another tip as you plan (or recover from) a typically expensive wedding. Our Affiliate program has no limitation on commission and some of our top affiliates earn up to thousands of dollars per month. If you’re curious about how our commission works:
- 15% Commission on all products
- 120 Day tracking cookie
- Data feed of over 900 products
Plus you get to use our exclusive coupon codes and also have our banners to share. So don’t forget to sign up with just a few clicks!
